Cooking, Baking, & Photo-taking

Follow me on my Cooking Journey…

Kale Chips May 14, 2011

Filed under: Baking,Photo-Taking — Angie S @ 7:01 pm

Happy Saturday!

It’s been a while since my last post – I know, I’m bad.  I really want to share this recipe for Kale Chips that I found by Gwyneth Paltrow when she was on Ellen.

Here’s the link to the video:

Kale Chips on Ellen

The recipe is really easy:

Take 1 bunch of kale and peel it from the stem into small pieces (I used about half the bunch)

Wash

Toss with olive oil and salt

Heat the oven to 350 degrees (A temperature is not mentioned, but 350 is pretty standard)

Cook on a cookie sheet for between 20-30 minutes.  Check after about 10 mins and they will be slightly golden and crispy when done.

Here are some “Before Photos”:

And some “After Photos”:

They were so good that I ate the whole plate =)


Chicken Pot Pie March 12, 2011

Filed under: Baking,Cooking,Meal Planning,Photo-Taking — Angie S @ 5:01 pm

Yes, I’ve been cooking, and yes I’m bad about keeping my posting up to date.  I’m always busy doing about a hundred things, so sometimes it’s hard to keep up with the blog.  I created a new format for recipes I find and try.  You will see that when you click on the Printable Version of Chicken Pot Pie.  The first page is the recipe including the name of the website where I found it, and a photo or two,  and the second page is my tips on the recipe and sometimes general tips that apply regarding cooking 🙂

Chicken Pot Pie – Printable

Chicken Pot Pie

Ingredients:

1 pound skinless, boneless chicken breast halves – cubed

1 can sliced carrots and peas

1/2 cup sliced celery

1/3 cup butter

1/3 cup chopped onion

1/3 cup all-purpose flour

1/2 teaspoon salt

1/4 teaspoon black pepper

1 can chicken broth

1/3 cup milk


Directions

1) Preheat oven to 425 degrees F.

2) In a saucepan, combine chicken, carrots, peas, and celery. Add water to cover and boil for 15 minutes. Remove from heat, drain and set aside.

3) In the saucepan over medium heat, cook onions in butter until soft and translucent. Stir in flour, salt, and pepper. Slowly stir in chicken broth and milk. Simmer over medium-low heat until thick. Remove from heat and set aside.

4) Prepare Jiffy pie crust.  Place the chicken mixture in bottom pie crust. Pour hot liquid mixture over. Cover with top crust, seal edges, and cut away excess dough. Make several small slits in the top to allow steam to escape.

5) Bake in the preheated oven for 30-40 minutes, or until pastry is golden brown and filling is bubbly. Cool for 10 minutes before serving.

ENJOY!!

I hope you enjoy this Chicken Pot Pie recipe as much as I did.  I had leftovers for a few days after and it was still as delicious as the first time I ate it 🙂


Meatballs & Meatball Subs February 22, 2011

Filed under: Baking,Cooking,Photo-Taking — Angie S @ 9:25 pm
Last night, I was in the mood to make meatballs. We had two sub rolls left in the house so I let the boys have them.  I enjoyed my meatballs in a dish with some parmesan cheese sprinkled on top.  We made a Caesar salad and had it on the side.  Dinner was delicious and we are planning on using the extra meatballs and sauce for some spaghetti this week 🙂
Meatball Ingredients
1 1/2 pounds ground beef
1 1/4 cups Italian seasoned bread crumbs (or crackers) (I used Ritz crackers)
1/4 cup chopped fresh parsley
Oregano – I added a tsp even though it wasn’t originally part of this recipe
4 cloves garlic, minced (I used 1 tsp already minced garlic from the jar)
1 small yellow onion, chopped (I chopped up really small using my food processor)
1 egg, beaten
1 (26 ounce) jar spaghetti sauce (I used 2 jars of Ragu)
1 (16 ounce) can crushed tomatoes (Skipped this)
1 (14.25 ounce) can tomato puree (Skipped this too)
Directions
1)   Preheat oven to 350 degrees.
2)   In a bowl, mix the ground beef, bread crumbs, parsley, oregano, garlic, onion, and egg. Shape the mixture into about 20 meatballs.
3)   Evenly space the meatballs on a cookie sheet, and then cook the meatballs for about 5-7 minutes on each side sealing them, and slightly browning the outside.
4)   In the crock pot, mix the spaghetti sauce, crushed tomatoes (if using), and tomato puree (if using).  Place the meatballs into the sauce mixture. Cook on Low for 6 to 8 hours.  I cooked on Low for an hour and then on High for another hour.

Here are some photos:
Meatball Mixture
Just before going into the oven.
Draining the Grease.
Standing out from the Crowd.
Cooking in the Crock Pot.
 

Baked Manicotti February 19, 2011

Filed under: Baking,Cooking,Photo-Taking — Angie S @ 12:22 am

I made Baked Manicotti a long, long time ago, and from what I remember it was good.  However, I tried making it again a few weeks ago when I had a friend over, and it was a Big Fat ‘Fail’.  We ended up ordering out for pizza instead.

I am very far from perfect when it comes to cooking.  I want to dive right in most of the time instead of reading directions fully first.  I can’t tell you how many times I have had to change dinner plans because I didn’t have one of the ingredients I needed.  So my advice for today is “Read Directions Fully” and make sure you have all ingredients and the right kitchen tools to do the job right before proceeding.

So second times a charm!  My Manicotti was Fabulous 🙂

Here’s the recipe I began with:

Baked Manicotti

Recipe Source:  allrecipes.com

I followed the recipe’s ingredients and also added about 1 cup of spinach.  I used my food processor and chopped it down so it was nice and small, and then I added it to the cheese mixture.

The most fun (no fun at all) part was stuffing the cheese mixture into the manicotti shells.  I used a 1 gallon plastic bag, and added the cheese mixture to it.  Then I cut a hole in one of the bottom corners of the bag.  This allowed me to squeeze the cheese mixture into the pasta.  I broke about 4 of the manicotti shells (said a bunch of *!*!?* words), and I ended up with a total of 10 shells.  I used (3) 26oz bottles of pasta sauce so the pasta was nice and covered.  Cooking time was for 30 minutes and then an additional 10 minutes after I added more mozzarella cheese to the top.  This recipe is nice to serve with salad and/or garlic bread.

ENJOY!!


Homemade Pizza February 10, 2011

Filed under: Baking,Photo-Taking — Angie S @ 5:02 pm

Homemade Pizza Recipe | Simply Recipes – Printable Version

I’ve always wanted to make homemade pizza, but I never have.  When I was planning food for this week, I decided it was going to be one of our meals.

So I got to work.  First I found a recipe that sounded good, then I made double the dough (in two separate batches) of what the recipe called for so that if I messed up I had extra dough to practice with.

Making the dough was as easy as 1,2,3…

First I mixed all of the ingredients together.

Next I let the dough rise in the oven for 1.5 hours.  I followed the recipe instructions and put the oven on 150 degrees (Actually 170 degrees/my oven doesn’t go any lower).  Then I shut the oven off and added the dough.

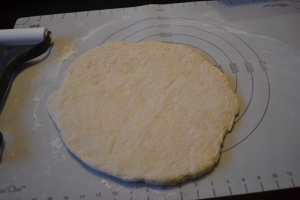
Lastly I shaped the dough with a rolling pin to get it ready for toppings.

So I messed the first pizza up:

The Crust is where I went wrong.

There was way too much Crust as you can see.

TIPS:  Instead of using your hands to shape the pizza, use a rolling pin.  This creates a more consistent thickness.  My first pizza was thin in some areas and thick in others.  I would skip adding a crust edge all together.  The pizza was good flat without an extra edge of crust.

Tadaahhhh!  I made a yummy pepperoni pizza 🙂


Nana’s Banana Bread :) February 9, 2011

Filed under: Baking,Photo-Taking — Angie S @ 5:19 pm

Banana Bread is one of my favorite breakfast sweet foods.  I don’t usually like sweets for breakfast, but I can enjoy a piece of banana bread every now and again.

Since the recipe is the one my nana used to make, I thought I would share her picture in this post.  Below is my Nana, me, and Pa on my first Birthday.  My Aunt Karen informed me that January 15, 2011 was the 20th anniversary of her death.  She was one of the best woman that I have ever known, and it really stinks that she passed away so young.  The song by Billy Joel “Only the Good Die Young” reminds me of her. So enjoy the recipe in memory of my Nana 🙂


NANA’S BANANA BREAD

Nana’s Banana Bread – Printable Version

INGREDIENTS:

1 3/4 c. flour

1 1/4 tsp. baking powder

1/2 tsp. baking soda

3/4 tsp. salt

1/3 c. shortening (I used canola oil)

2/3 c. sugar

2 slightly beaten eggs

1 c. mashed banana (2 to 3 bananas)

TIPS:

I substitute canola oil for shortening (don’t try olive oil-it will make the bread taste awful)

You want the bananas to be very ripe and brown – just not rotten

PREPARATION:

1. Preheat oven to 350 degrees.

2. Dry Mixture (Medium Sized – Bowl #1):  Sift flour, measure and add baking powder, baking soda, salt, and then sift again.

3. Wet Mixture (Large Sized – Bowl #2): Cream shortening or add canola oil/as is, add sugar and gradually continue beating with an electric mixer until light and fluffy.  Then add eggs and mix with a spoon until mixture is smooth.

4.  Mash bananas with a fork.

5.  Add dry ingredients alternately with the mashed banana to the wet mixture.  Stirring fast enough to combine thoroughly.  Do not beat.

6.  Grease a loaf pan, and cook for between 40 minutes to 1 hour depending on your oven.  Bread will be nicely brown on top when it’s ready.  Just like the piece in the photo below:

ENJOY!!


A Chickpea kind of day… February 8, 2011

Filed under: Cooking,Photo-Taking — Angie S @ 5:37 pm

Yesterday I was in the mood to make some hummus, and then I decided I needed something quick for dinner before Lily’s puppy training class, so I made chickpea burgers.  You could say yesterday was a Chickpea kind of day for me.

Honestly I bought my food processor because –I Love Hummus– and I figured it would come in handy for other things as well.

I used 2 Rachel Ray recipes:

Greek Hummus – Printable Version (Rachel Ray)

INGREDIENTS

1 can chick peas (15 ounces), drained

2 lemons

1 sprig fresh oregano, leaves chopped

1 clove garlic, finely chopped

Salt – to taste

2 rounded tablespoons tahini paste

A handful fresh flat leaf parsley

1 sack pita chips, sea salt variety (such as Stacy’s brand)

TIPS

If you plan on trying this recipe out, be sure to save old hummus or takeout containers of appropriate size that would be good to store the hummus.

PREPARATION

Combine chick peas, juice of 1 lemon and oregano in food processor. Mash garlic into paste with some salt

pressing under the flat part of your knife then add garlic to processor along with tahini paste and parsley.

Process hummus until smooth (add a splash of water if too thick).

Chickpea burgers – Printable Version (Rachel Ray)

It really looks like an english muffin in this pic…lol 😉

INGREDIENTS

One can chickpeas (15 ounces), rinsed and drained

One can diced green chilies (4 ounces)

2/3 cup packed flat leaf parsley leaves

2/3 cup breadcrumbs

Salt and pepper

1 large egg, lightly beaten

2 tablespoons vegetable oil

4 thin slices cheddar cheese

4 hamburger buns

Dijon mustard, ketchup or mayonnaise, for serving

TIPS

I think these burgers could have been more flavorful.  Maybe adding a little onion to the mix or cheese inside of the burgers would have done the trick.  I have to think more about it for next time.

PREPARATION

In a food processor, pulse the chickpeas, green chilies and parsley until finely chopped.

Transfer the mixture to a medium bowl and stir in the breadcrumbs and salt and pepper, to taste. Stir in the egg and form the mixture into four patties, each about 2/3-inch thick.

In a large skillet or grill pan, heat the vegetable oil over medium-low heat. Cook the burgers for four minutes, then flip and cook them for 3 minutes more.

Top the patties with the cheese slices for the last minute of cooking. Serve the cheeseburgers on the hamburger buns with mustard, ketchup or mayonnaise.


Jeff’s Spaghetti with Garlic Bread February 5, 2011

Filed under: Cooking,Photo-Taking — Angie S @ 1:10 am

Hi,

I’m back.  No more make something new each day for me.  It didn’t work out…I am not an everyday blogger.  I just don’t have time.  Not too mention sometimes I’m too lazy to cook, bake, and take photos.  I do it on my own schedule.  So that’s that.

Being back and sharing is important 🙂

So Spaghetti with Garlic Bread.

Ingredients:

2-24 oz. jars of Newman’s Own Sockarooni sauce

1 lb. Barilla spaghetti

1 lb. ground beef

1 lb. ground sweet or mild italian sausage

1 pinch of oregano, 1 tsp minced raw garlic, and a pinch of red pepper

2 pieces per person – Texas Toast (usually 8 to a pack)

Directions:

1)  Pick your pans:  1 for spaghetti and 1 for the sauce.

Left Sauce and Right Spaghetti.

2)  Spaghetti – Get the water going 1st if you are cooking a whole pound like I did.  That way you are not waiting for the spaghetti to finish cooking at the end.  I’m so impatient, and the last thing I want to do is make this mistake “again”.  Lesson Learned…anything to cut down on my impatience in the kitchen 🙂

Spaghetti

I used Barilla Spaghetti. I really like using wheat everything, but I didn’t feel like cooking more spaghetti on the side.

2)  Sauce – Add the  2-24 oz jars of sauce to the sauce pan.  Also add the oregano, minced raw garlic, and red pepper.

3)  Meat – Start with the sausage first.  Break it down into small pieces as you are cooking.   Cook throughly and then put in the sauce pan.  Wash the pan (to cut down on dishes) and repeat the process for the ground beef.

3)  Sauce – Let the sauce simmer while the spaghetti is cooking.

4)  Spaghetti – Add the spaghetti to the water once the water starts boiling.  Follow package directions.

5)  Garlic Bread – Preheat the oven for the garlic bread.  For this recipe I used Texas Toast.  If you have everything you need, homemade garlic bread is always delicious (I will post my easy to make garlic bread recipe soon).  Start cooking the garlic bread when the spaghetti is almost done, so you serve it right from the oven.

6)  Serve and Enjoy 🙂


Make Something New Every Day for a Year… January 13, 2011

Filed under: Baking,Cooking,Meal Planning,Photo-Taking — Angie S @ 7:45 pm

Happy Thursday!!

So I am going to participate in the Create Something New for a Year idea.  My theme is my blog theme:  cooking, baking, and photo-taking.  So if I don’t cook or bake, I can share new photos…food related of course.

Here are the links on etsy & facebook for this challenge:

http://www.etsy.com/storque/how-to/make-something-every-day-11501/

http://www.facebook.com/makesomething365?v=wall

I believe I will be making meatloaf for dinner tonight, so I can share that recipe along with my Aunt Karen’s mashed potato recipe later.  Be on the look out…

Yesterday, Meal Planning & Shopping went really well (using my resources), so I will be sure to post links that will help you with this too 🙂

-Angie Crocker


Ringing in the New Year in my Kitchen January 7, 2011

Filed under: Baking,Cooking,Meal Planning,Photo-Taking — Angie S @ 7:43 pm

I’m back.  It’s 2011.  I’m Married.  I’m Ready to take on my Kitchen.

I’ve been thinking of new ways to plan meals and here’s what’s new:

  • We have a new food scale 🙂  I am really liking it.  It helps to control portion sizes so there is less waste.
  • I have printed out a calendar for the fridge, and I am writing down what we have for dinner every night.
  • I have a food planning binder to keep track of:  Our Master Meal List, Monthly Meal Calendar (currently on the fridge), Portion sizes per meal (ex. 1 lb of ground beef for taco night), and the Grocery List.

Currently my Grocery List is under construction, but once I get it to my liking, I will post and share.

Recently I have made things like Meatballs, Shepard’s Pie, and Chocolate Covered Pretzels.  I will post these recipes and pictures really soon.

-Angie